


- If you are using an IDE
- If you are using a Notepad
- If you are using a Terminal and
- If you are using a Binary
We Began With Installing Java in Windows 10 in just 1 minute
Some PCs might have Java already installed.
To check if you have Java installed on a Windows PC, search in the start bar for Java or type the following in Command Prompt (cmd.exe):
C:\Users\BlueTEXT.in>java -versionIf Java is installed, you will see something like this (depending on version):
java version "11.0.1" 2018-10-16 LTSIf you do not have Java installed on your computer, you can download it for free from OpenJDK.
Java(TM) SE Runtime Environment 18.9 (build 11.0.1+13-LTS)
Java HotSpot(TM) 64-Bit Server VM 18.9 (build 11.0.1+13-LTS, mixed mode)
and Double Click To install it now
How to Setup Java for Windows 10 :
1) Go to "System Properties" (Can be found on Control Panel > System and Security > System > Advanced System Settings) (Click on the Image to ZOOM)

2) Click on the "Environment variables" button under the "Advanced" tab

3) Then, select the "Path" variable in System variables and click on the "Edit" button

4) Click on the "New" button and add the path where Java is installed, followed by \bin. By default, Java is installed in C:\Program Files\Java\jdk-11.0.1 (If nothing else was specified when you installed it). In that case, You will have to add a new path with: C:\Program Files\Java\jdk-11.0.1\bin
Then, click "OK", and save the settings
Then, click "OK", and save the settings

5)At last, open Command Prompt (cmd.exe) and type java -version to see if Java is running on your machine
Write the following in the command line (cmd.exe):
Write the following in the command line (cmd.exe):
C:\Users\BlueTEXT.in> java -version
If Java was successfully installed, you will see something like this (depending on version):
java version "11.0.1" 2018-10-16 LTS
Java(TM) SE Runtime Environment 18.9 (build 11.0.1+13-LTS)
Java HotSpot(TM) 64-Bit Server VM 18.9 (build 11.0.1+13-LTS, mixed mode)
We have successfully installed java now let us learn how to compile and execute in different environments.
1)If you are using a Terminal / Notepad
In Java, every application begins with a class name, and that class must match the filename.
Let's create our first Java file, called MyClass.java, which can be done in any text editor (like Notepad).
The file should contain a "Hello World" message, which is written with the following code:
public class MyClass {
  public static void main(String[] args) {
    System.out.println("Hello World");
  }
}To Find How to Navigate to a Folder in Windows Terminal is :
Find the File in File Manager Now


Now Open Terminal and Type cd <Space> Location of the File

Save the code in Notepad as "MyClass.java". Open Command Prompt (cmd.exe), navigate to the directory where you saved your file, and type "javac MyClass.java":
C:\Users\BlueTEXT.in> javac MyClass.java
This will compile your code. If there are no errors in the code, the command prompt will take you to the next line. Now, type "java MyClass" to run the file:
This will compile your code. If there are no errors in the code, the command prompt will take you to the next line. Now, type "java MyClass" to run the file:
The Commandant to execute a compiled Java programs is :
C:\Users\BlueTEXT.in> java MyClass
The output should read:
C:\Users\BlueTEXT.in> Hello World
Congratulations! You have written and executed your first Java program.
2)If you are using an IDE
We are Using VS Code to Compile and Execute a Java Applications
For Java developers on Visual Studio Code, the Language Support for Java(TM) by Red Hat extension has been great for providing language features such as IntelliSense and project support. At the same time, we've also heard feedback that users would also like Java debugging. Today, we're excited to announce our ongoing collaboration with Red Hat and enabling Java developers to debug Java applications with a new lightweight Java Debugger for Visual Studio Code based on Java Debug Server.

Note: Both the Java Debugger for Visual Studio Code and Java Debug Server will be open sourced shortly after the initial release.
To help Java developers to get started with VS Code quickly, we also created a Java Extension Pack which includes both the Language Support for Java(TM) by Red Hat and Java Debugger for Visual Studio Code extensions so you won't need to search for them individually. This is just the start to creating a modern workflow for Java and we'll be adding more features and extensions to the Java Extension Pack in the future.

For Java developers on Visual Studio Code, the Language Support for Java(TM) by Red Hat extension has been great for providing language features such as IntelliSense and project support. At the same time, we've also heard feedback that users would also like Java debugging. Today, we're excited to announce our ongoing collaboration with Red Hat and enabling Java developers to debug Java applications with a new lightweight Java Debugger for Visual Studio Code based on Java Debug Server.
Note: Both the Java Debugger for Visual Studio Code and Java Debug Server will be open sourced shortly after the initial release.
To help Java developers to get started with VS Code quickly, we also created a Java Extension Pack which includes both the Language Support for Java(TM) by Red Hat and Java Debugger for Visual Studio Code extensions so you won't need to search for them individually. This is just the start to creating a modern workflow for Java and we'll be adding more features and extensions to the Java Extension Pack in the future.
Getting started#
To get started:
Install the Java Extension Pack
After reloading VS Code, open a folder that contains a Java project and follow below steps:
To get started:
- In Visual Studio Code, open the Extensions view (Ctrl+Shift+X).
- Type "java" to filter the list.
- Find and install the Java Extension Pack or standalone Java Debugger for Visual Studio Code extension if you already have Language Support for Java(TM) by Red Hat installed.
Install the Java Extension Pack
After reloading VS Code, open a folder that contains a Java project and follow below steps:
- Prepare the project. Open a .java file, and the Java extensions will be activated. Maven, Gradle and Eclipse projects are supported. Project build is automatically handled by the extensions, no need to be triggered manually.
- Start debugging. Switch to Run view (Ctrl+Shift+D) and open launch.json to add a debug configuration for Java.
- Fill in the mainClass for Launch setting or hostName and port for Attach.
- Set your breakpoint and hit F5 to start debugging.
Debug Console - The Debug Console lets you see information from both stdout and stderr.
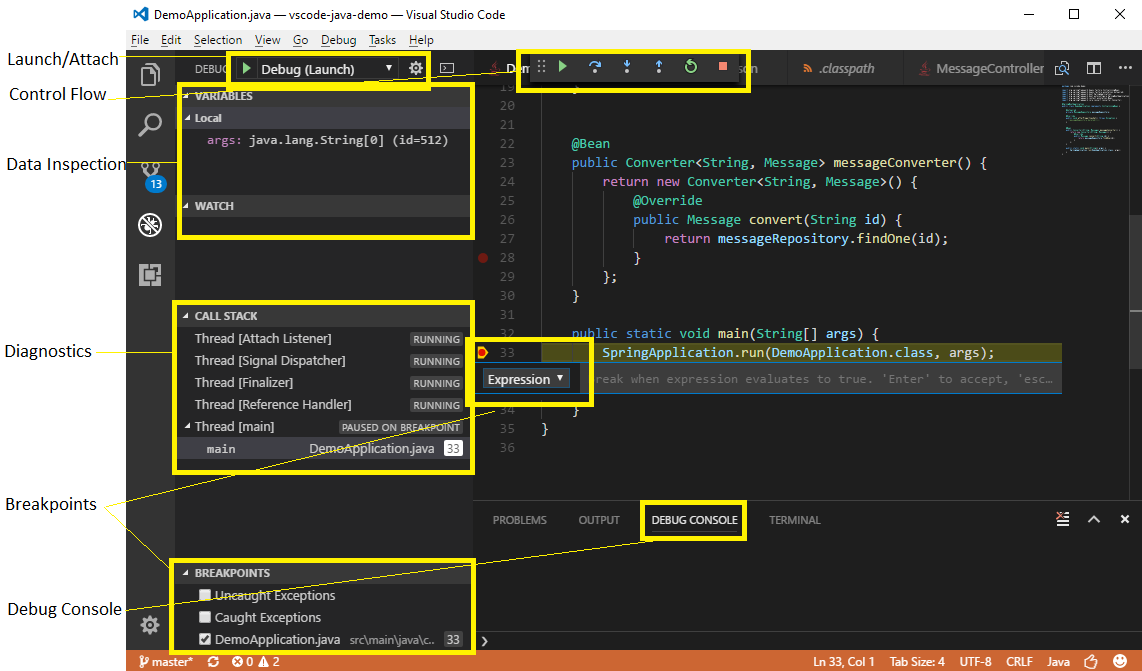
So the reason for using an IDE is its support for Debugging. This is very important during Error handling
So, this is how you can Compile and run a Java Application in Different Environments.
Pleas Follow us for more Informational Content.


